Pegasus 1000-Genome with DFTracer
Instructions for tracing Pegasus 1000 Genome with DFTracer on LC Corona. These instructions can be used for any Workflow but you’ll need to change the version of the tar files depending on the architecture of your machine and the workflow you are interested in. For more information, visit the workflows repository.
To follow this tutorial you will need the following requirements: - Installed Condor. - Installed Pegasus Workflow Manager. - Python Virtual Environment with DFTracer installed.
Please refer to Pegasus Montage with DFTracer for completing these requirements.
Step 1: Activate Environment
Source the Python Virtual Environmnet that has DFTracer.
1.1 Create and activate Virtual Environment:
python3 -m venv /path/to/pegasus-env
source /path/to/pegasus-env/bin/activate
1.2 Get the dependencies:
pip install git+https://github.com/LLNL/dftracer.git
Step 2: Get the 1000genome-workflow
Get the code:
git clone https://github.com/pegasus-isi/1000genome-workflow.git
Step 3: Prepare software for Pegasus-1000Genome
3.1 Save to PATH:
export PATH=/path/to/pegasus/install/bin:$PATH
export PATH=/path/to/pegasus/install/sbin:$PATH
export LD_LIBRARY_PATH=/path/to/pegasus/install//lib:$LD_LIBRARY_PATH
source ~/.bashrc
3.2 Run Condor:
chmod 777 /path/to/pegasus/install/condor.sh
. /path/to/pegasus/install/condor.sh
condor_master
condor_status  # it should show the activity
condor_q  # it should show the jobs running
Note
If errors occur, echo the LD_LIBRARY_PATH and the PATH and make sure /pegasus/install is there.
To check if condor_shedd and all other condor processes are running:
ps aux | grep condor
If Condor throws errors while trying to connect to another node:
Exit the flux allocation:
exit
Check your processes:
ps -u ${USER}
Kill all your processes (or those related to Condor if any):
killall -u ${USER}
Repeat steps 6.3, 6.4, 5.2, 6.5
If the problem persists:
condor_restart
3.3 Test Pegasus:
pegasus-version # should show 5.0.7
If error “Cannot find file with permissions” occurs, touch that file and make sure it has those permissions.
3.4 Configure the Condor/SLURM interface:
pegasus-configure-glite
Note
If error “Cannot find file with permissions” occurs, touch that file and make sure it has those permissions.
3.5 Configure the DFTracer flags:
export DFTRACER_INSTALLED=/path/to/pegasus-env/lib/python3.9/site-packages/dftracer/
export LD_LIBRARY_PATH=$DFTRACER_INSTALLED/lib:$DFTRACER_INSTALLED/lib64:$LD_LIBRARY_PATH
export DFTRACER_LOG_FILE=/path/to/traces/trace
# export DFTRACER_DATA_DIR=all (optional)
export DFTRACER_ENABLE=1
export DFTRACER_INC_METADATA=1
# export DFTRACER_INIT=PRELOAD (optional)
export DFTRACER_BIND_SIGNALS=0
# export DFTRACER_LOG_LEVEL=ERROR (optional)
export DFTRACER_TRACE_COMPRESSION=1
# dftracer=$DFTRACER_INSTALLED/lib64/libdftracer_preload.so (optional)
You would only need to use the preload version of DFTracer if you have not annotated the application code you are running. For more information on the flags and their functionalities please turn to :docs:`examples`.
Step 4: Annotate 1000-Genome
4.1 Configure the DFTracer flags:
export DFTRACER_INSTALLED=/path/to/pegasus-env/lib/python3.9/site-packages/dftracer/
export LD_LIBRARY_PATH=$DFTRACER_INSTALLED/lib:$DFTRACER_INSTALLED/lib64:$LD_LIBRARY_PATH
export DFTRACER_LOG_FILE=/path/to/traces/trace
# export DFTRACER_DATA_DIR=all (optional)
export DFTRACER_ENABLE=1
export DFTRACER_INC_METADATA=1
# export DFTRACER_INIT=PRELOAD (optional)
export DFTRACER_BIND_SIGNALS=0
# export DFTRACER_LOG_LEVEL=ERROR (optional)
export DFTRACER_TRACE_COMPRESSION=1
# dftracer=$DFTRACER_INSTALLED/lib64/libdftracer_preload.so (optional)
4.2 Navigate to the /path/to/1000genome-workflow directory. The source code that is useful to annotate and “time” for Monatge is in the /bin folder. As an example we use the frequency.py application which is located in /path/to/1000genome-workflow/bin folder. We annotate the code as follows:
from dftracer.logger import dftracer, dft_fn
log_inst = dftracer.initialize_log(logfile=None, data_dir=None, process_id=-1)

CAT = "PY_APP"

df_log = dft_fn(CAT)

...

class ...
...
if __name__ == '__main__':
    with dft_fn(name=f"frequency", cat=CAT):
    (code...)
    log_inst.finalize()
The idea is to annotate the application so that we capture all the calls that occur during the running of the main fuction. These application calls will appear on the traces as events with “CAT:PY_APP” and their name will be “frequency”. We can annotate further, by creating regions. For more details please refer to examples.rst.
4.3 After the annotation with DFTracer, we can run the workflow with pegasus after first creating the data, planning the workflow and executing with pegasus-run:
./prepare_input.sh
./daxgen.py
./daxgen.py -D 20130502 -f data.csv -i 1
For more information please visit https://github.com/pegasus-isi/1000genome-workflow/tree/master.
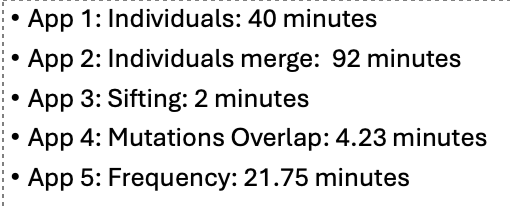
4.4 After the workflow finishes we navigate into /path/to/traces/ that we set earlier with the DFTracer flags. We then load those traces on DFAnalyzer. The application calls will also have “CAT: PY_APP” as this is a Python code workflow. Here is the result of tracing 1000 Genome on LC Corona with 32 nodes and 48 processes per node using DFTracer and analyzing the tracing using DFAnalyzer: