Pegasus Montage with DFTracer
Instructions for tracing Pegasus Montage with DFTracer on LC Corona. These instructions can be used for any Workflow but you’ll need to change the version of the tar files depending on the architecture of your machine and the workflow you are interested in. For more information, visit the workflows repository.
Step 1: Install Condor
1.1 Get the zip:
wget https://research.cs.wisc.edu/htcondor/tarball/10.x/current/condor-x86_64_CentOS8-stripped.tar.gz
1.2 Untar to your condor folder:
tar -x -f condor*.tar.gz
mkdir condor
cd condor-*stripped
mv * ../condor
cd ..
rm -rf condor-*stripped
rm condor-stripped.tar.gz
1.3 Configure:
cd condor
./bin/make-personal-from-tarball
Step 2: Install Pegasus
2.1 Get the zip from Tarballs:
wget https://download.pegasus.isi.edu/pegasus/5.0.7/pegasus-binary-5.0.7-x86_64_rhel_7.tar.gz
wget https://download.pegasus.isi.edu/pegasus/5.0.7/pegasus-worker-5.0.7-x86_64_rhel_7.tar.gz
2.2 Untar to your Pegasus folder (both for pegasus and pegasus-worker):
tar zxf pegasus-*.tar.gz
rm pegasus-*.tar.gz
Step 3: Install and compile Montage
3.1 Get the code:
git clone https://github.com/Caltech-IPAC/Montage.git
3.2 Compile:
cd Montage
make
Note
Make sure there are no errors. By cloning the GitHub repo, you get the most recent version, likely with no compiler errors. cd Montage/bin and make sure it is not empty.
3.3 Save in Paths:
export PATH=/path/to/Montage/bin:$PATH
Step 4: Get the montage-pegasus-v3
4.1 Create and activate Virtual Environment:
python3 -m venv /path/to/pegasus-env
source /path/to/pegasus-env/bin/activate
4.2 Install dependencies:
pip install astropy
pip install pegasus-wms
pip install git+https://github.com/hariharan-devarajan/dftracer.git
4.3 Get the code:
git clone https://github.com/pegasus-isi/montage-workflow-v3.git
Step 5: Compile the pegasus-mpi-cluster from source
5.1 Get the code:
git clone https://github.com/pegasus-isi/pegasus.git
5.2 Make sure you’re in the virtual environment for Pegasus:
source /path/to/pegasus-env/bin/activate
5.3 Make sure you have the prerequisites:
Git
Java 8 or higher
Python 3.5 or higher
R
Ant
gcc
g++
make
tox 3.14.5 or higher
mysql (optional, required to access MySQL databases)
postgresql (optional, required to access PostgreSQL databases)
Python pyyaml
Python GitPython
5.4 Compile:
cd pegasus
ant compile-pegasus-mpi-cluster
5.5 Copy it to your Pegasus folder:
cd packages/pegasus-mpi-cluster/
cp pegasus-mpi-cluster/ /path/to/pegasus-5.0.7/bin
Note
If errors occur while compiling, make sure that MVAPICH is loaded:
module load mvapich2-tce/2.3.7
echo $LD_LIBRARY_PATH
Step 6: Create a single “install” directory for all Pegasus software
This will help in resolving errors like “cannot find .. in your path”.
6.1 Move into the Pegasus directory (the one you compiled from source) and make a directory called install:
cd pegasus
mkdir install
6.2 Copy all components from pegasus-5.0.7 and condor into the pegasus/install folder:
cd ../condor
cp * ../pegasus/install
cp -r * ../pegasus/install
cd ../pegasus-5.0.7
cp * ../pegasus/install
cp -r * ../pegasus/install
Note
If you encounter errors about overwriting /bin or /lib folders, you have to do it manually by cd into those folders and copying everything to /pegasus/install/bin or /pegasus/install/lib. Make sure all components are there, otherwise Pegasus and Condor cannot run.
Step 7: Prepare software for Pegasus-Montage
7.1 Make sure you are in the virtual environment still. If not, source it again by repeating 5.2.
7.2 Save to PATH:
export PATH=/path/to/pegasus/install/bin:$PATH
export PATH=/path/to/pegasus/install/sbin:$PATH
export LD_LIBRARY_PATH=/path/to/pegasus/install//lib:$LD_LIBRARY_PATH
source ~/.bashrc
7.3 Run Condor:
chmod 777 /path/to/pegasus/install/condor.sh
. /path/to/pegasus/install/condor.sh
condor_master
condor_status  # it should show the activity
condor_q  # it should show the jobs running
Note
If errors occur, echo the LD_LIBRARY_PATH and the PATH and make sure /pegasus/install is there.
To check if condor_shedd and all other condor processes are running:
ps aux | grep condor
If Condor throws errors while trying to connect to another node:
Exit the flux allocation:
exit
Check your processes:
ps -u ${USER}
Kill all your processes (or those related to Condor if any):
killall -u ${USER}
Repeat steps 6.3, 6.4, 5.2, 6.5
If the problem persists:
condor_restart
7.4 Test Pegasus:
pegasus-version # should show 5.0.7
If error “Cannot find file with permissions” occurs, touch that file and make sure it has those permissions.
7.5 Configure the Condor/SLURM interface:
pegasus-configure-glite
Note
If error “Cannot find file with permissions” occurs, touch that file and make sure it has those permissions.
7.6 Configure the DFTracer flags:
export DFTRACER_INSTALLED=/path/to/pegasus-env/lib/python3.9/site-packages/dftracer/
export LD_LIBRARY_PATH=$DFTRACER_INSTALLED/lib:$DFTRACER_INSTALLED/lib64:$LD_LIBRARY_PATH
export DFTRACER_LOG_FILE=/path/to/traces/trace
# export DFTRACER_DATA_DIR=all (optional)
export DFTRACER_ENABLE=1
export DFTRACER_INC_METADATA=1
# export DFTRACER_INIT=PRELOAD (optional)
export DFTRACER_BIND_SIGNALS=0
# export DFTRACER_LOG_LEVEL=ERROR (optional)
export DFTRACER_TRACE_COMPRESSION=1
# dftracer=$DFTRACER_INSTALLED/lib64/libdftracer_preload.so (optional)
You would only need to use the preload version of DFTracer if you have not annotated the application code you are running. For more information on the flags and their functionalities please turn to :docs:`examples`.
Step 8: Annotate Montage
8.1 Navigate to the /path/to/Monatge directory. Most of the source code that is useful to annotate and “time” for Monatge is in the /Monatge and /MoantgeLb folder. As an example we use the mDiff.c application which is located in /path/to/Monatge/Monatge folder. The first step is to link the source code with DFTracer. For that we edit the Makefile located in the same folder as following:
.SUFFIXES:
.SUFFIXES: .c .o

CC     =    gcc
MPICC  =
CFLAGS =    -g -O2 -I. -I../lib/include -D_LARGEFILE_SOURCE -D_FILE_OFFSET_BITS=64 -std=c99
LIBS   =    -L../lib -lwcs -lcfitsio -lcoord -lmtbl -lsvc \
        -lwww -lboundaries -lpixbounds -ltwoplane -lm

# Define flags
DF_CFLAGS = -I/usr/workspace/iopp/kogiou1/venvs/pegasus-env/lib/python3.9/site-packages/dftracer/include
DF_LDFLAGS = -L/usr/workspace/iopp/kogiou1/venvs/pegasus-env/lib/python3.9/site-packages/dftracer/lib64 -ldftracer

# Add flags to CFLAGS and LIBS
CFLAGS += $(DF_CFLAGS)
LIBS += $(DF_LDFLAGS)


SBINS  =  mConvert mFlattenExec mHdrCheck mHdrtbl mTblSort mTileHdr mTileImage
MBINS  =  mProjExecMPI mFitExecMPI mDiffExecMPI mBgExecMPI mAddMPI  mAddExecMPI

BINS   =    $(SBINS)


# uncomment the next two lines to build MPI modules
MPICC  =    mpicc
BINS =              $(SBINS) $(MBINS)


.c.o:
        $(CC) $(CFLAGS)  -c  $*.c

mDiff:              mDiff.o debugCheck.o checkHdr.o checkWCS.o
            $(CC) -o mDiff mDiff.o debugCheck.o checkHdr.o checkWCS.o \
            $(LIBS)
8.2 Edit the /path/to/Monatge/mDiff.c file as follows:
#include <dftracer/dftracer.h>
...
int main(int argc, char **argv)
{
    DFTRACER_C_INIT(NULL, NULL, NULL);
    ...
    if (MPI_err != 0) {
        printf("[struct stat=\"ERROR\", msg=\"MPI initialization failed\"]\n");
        DFTRACER_C_FINI();
        exit(1);
    }
    ...
    DFTRACER_C_FINI();
    exit(1);
}
The idea is to initialize DFTracer at the start of the main function and then finilize DFTracer before we exit the function so that we can capture the time, as well as the application and the system calls with DFTracer that take place while mDiff application is running. We can annotate further, by creating regions. For more details please refer to examples.rst.
8.3 After annotating the code we need to compile Montage using DFTracer. For that we need to source the Python environment that we have used to install DFTracer in and install it from source too (to access DFAnalyzer Jupyter Notebook). For details on that please refer to Build DFTracer. We then compile Montage as normal:
cd /path/to/Montage/
make
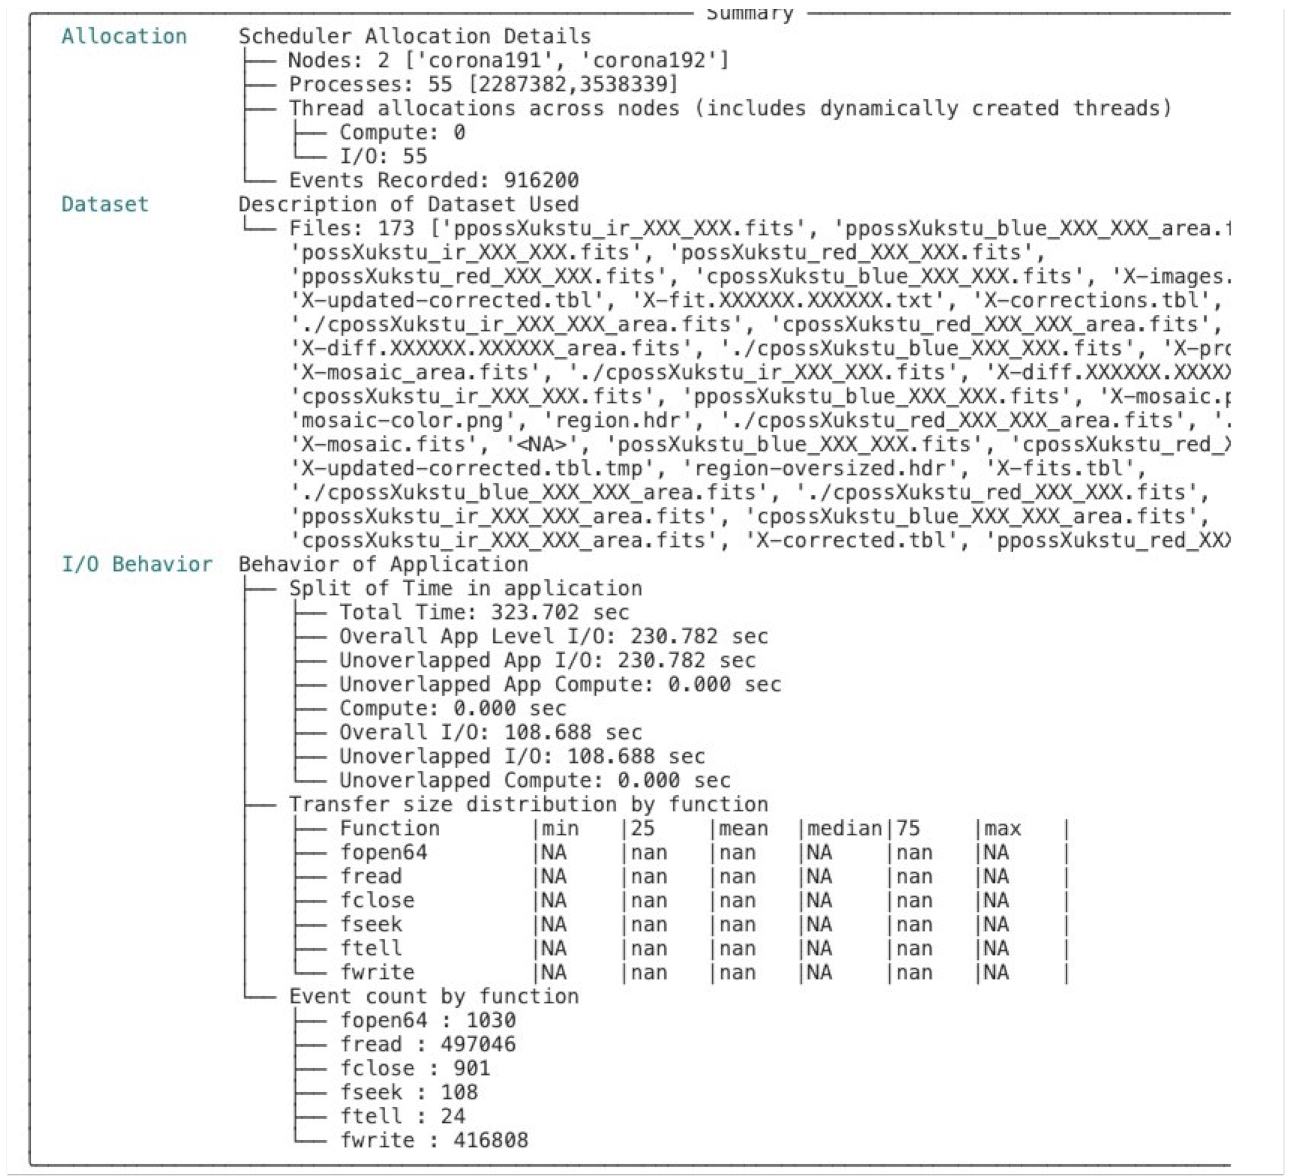
8.4 After the compilation with DFTracer, we can run Montage with pegasus after navigating to /path/to/montage-pegasus-v3/example-2mass.sh. The steps are that we ceate the data by running montage-workflow.py, then plan the workflow and then run it with pegasus-run. For more information please visit <https://pegasus.readthedocs.io/en/stable/>.
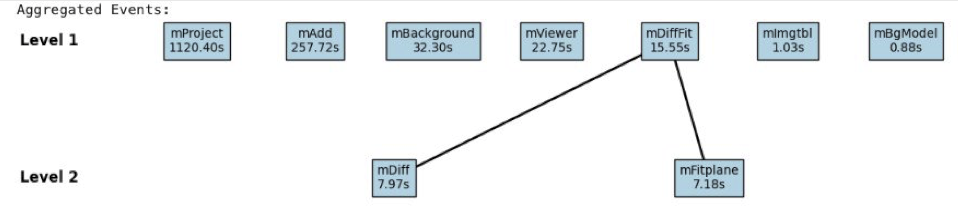
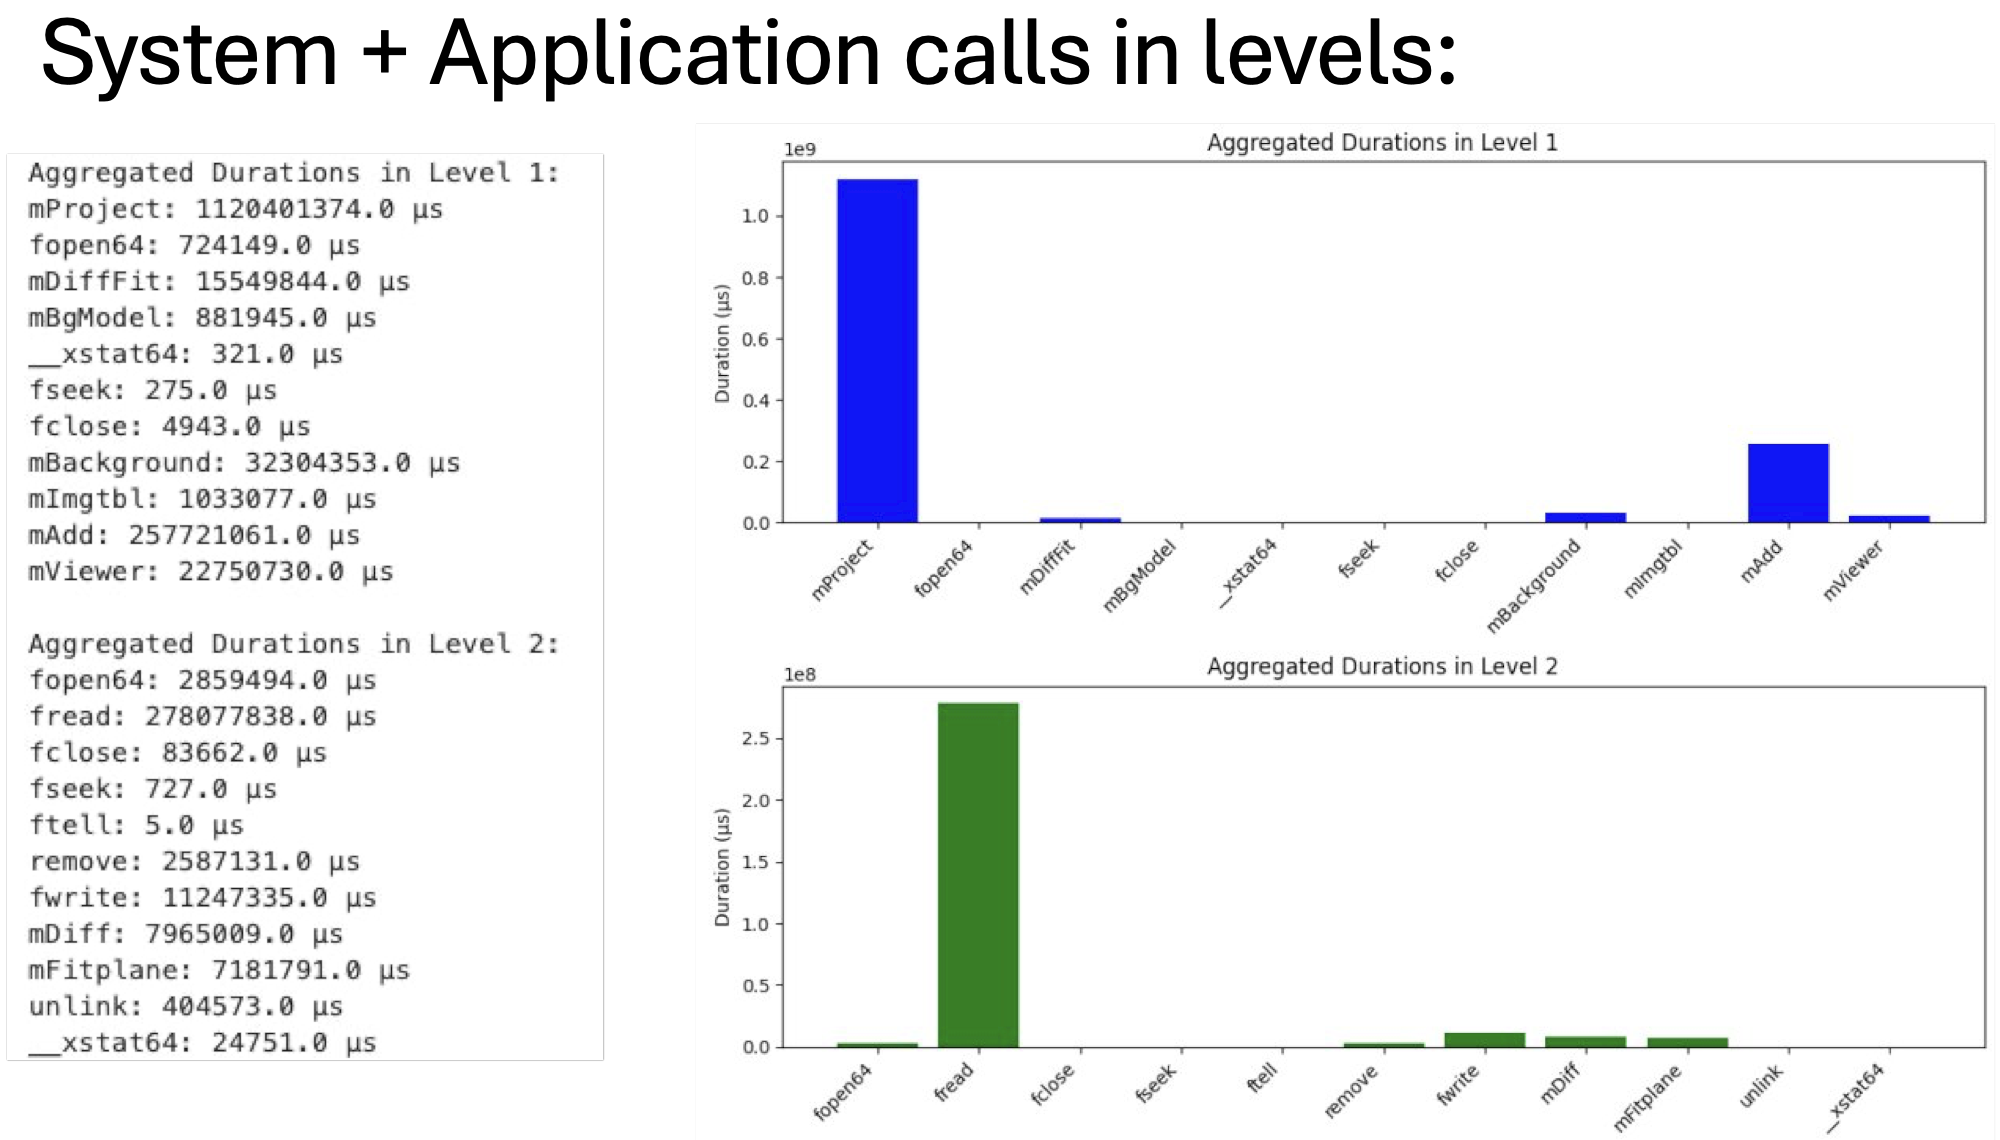
8.5 After the workflow finishes we navigate into /path/to/traces/ that we set earlier with the DFTracer flags. We then load those traces on DFAnalyzer. Depending on which application or system call was first, the traces will contain information regarding the “Level” of the call and “args:p_idx”. The application calls will also have “CAT: C_APP” as this is a C code workflow. These can be used to further create a graph of calls. Here is the result of tracing Montage on LC Corona with 2 nodes and 55 processes using DFTracer and analyzing the tracing using DFAnalyzer: